
How to Blend Colors in Procreate: A step by step tutorial for Beginners
 This is probably the one question I get asked pretty much everyday on Instagram. Though I have 2 classes on Blending in Procreate on my store, I have decided to make a tutorial with written instructions as not everyone might not be able to purchase the video tutorials. This is going to be more like a coloring tutorial than only blending.
Canvas size I'm using for this drawing is 5000x5000 (Pixels) , 300 DPI; mostly I use 3200x4200 (Pixels) and using my Custom Procreate Brushes for sketching and coloring used the Details brush and, for blending Soft and Grainy blending brush.
I am drawing Princess Moana for this tutorial. I usually draw with black but like to change the color to something purplish or radish, no specific reason, I just like it that way. And here's how I do it (I have been asked several times that's why I thought I would share that as well)
- First I create a new layer on top of the sketch and fill it up with a color of my preference
- Next use the layer as clipping mask

Now let's begin the coloring part !
Step 1: When I'm done with my sketch/outline I create a new layer underneath the sketch layer, you can name it base if want. Then I block the sketch with either a solid color or use separate colors for separate areas below the sketch layer (I adjust the colors by adjusting hue, saturation and brightness later if required)

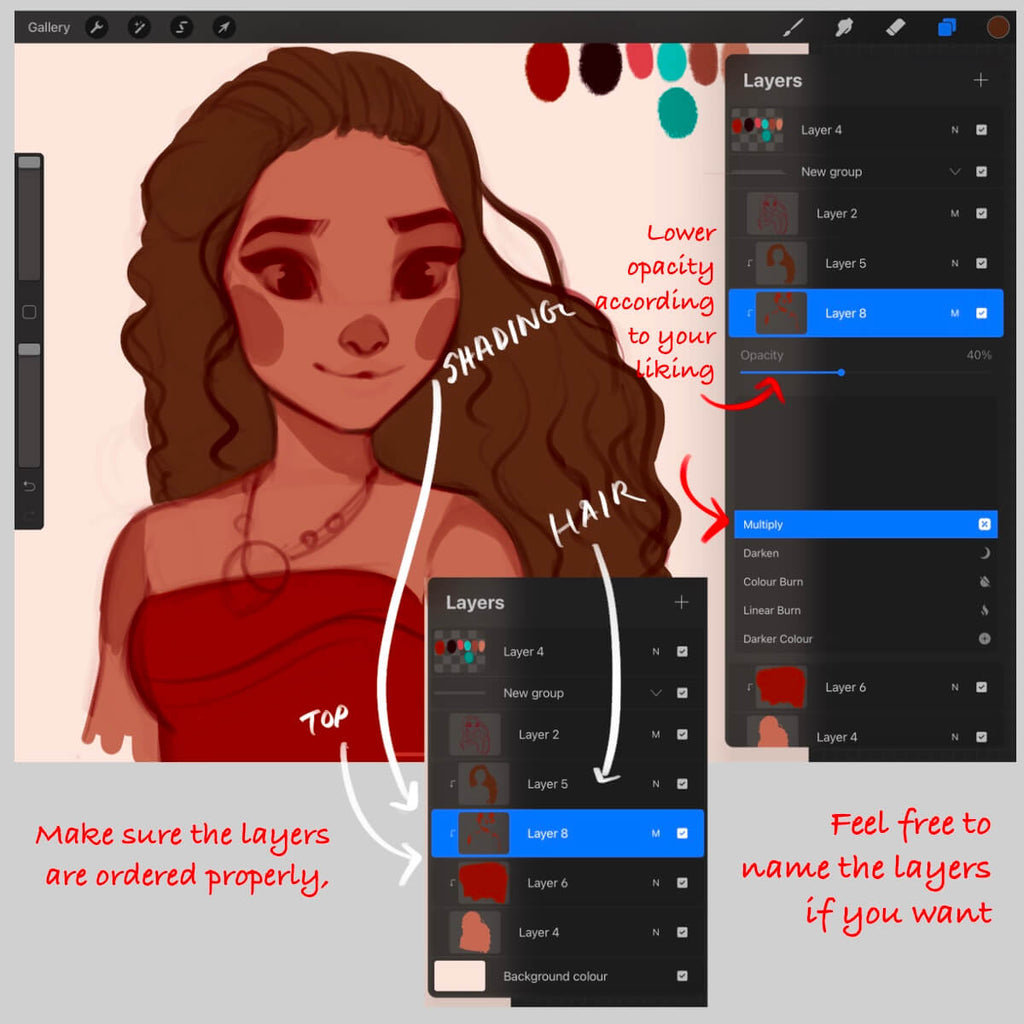
Next I am using separate layers as clipping mask to color her hair and top below the sketch layer and above the base layer. I use separate layers for almost everything; that way it's easier to make changes to a particular area with less effort.

Step 2: For shading I create a new layer and use a reddish color to simply paint over the areas I want darker like shown in the image below. I always use blend mode multiply for shading.
💎 Pro Tip: The brushes I use for blending in this tutorial are from my Muzenik Procreate Painting Brushes set — specifically the Soft and Grainy blending brushes. They make smudging so much smoother than the default Procreate brushes!
Step 3: Next I simply smudge the paints using the smudge tool (the finger like icon next to brush, check out the video below to watch me blend) as I mentioned earlier, I use my custom brushes for blending, but you can use the default ones as well.

Before I had created my brushes I used to use these for blending :
For very soft blending "Acrylic brush" from Painting and for a little rough texture "Stucco" from Painting.
You can opt for the airbrushes as well, even though personally I don't like to use airbrushes I think they are worth giving a try.
Secondly, I highly recommend you to try the painting and artistic brushes, some of them are rearly good, so do some experiments and find out for yourself which one you are comfortable with or which one suits your style.
Step 4: To add details I keep adding new layers on top of the rest as long as I need. Always be sure to adjust brush size and brush opacity throughout your blending process. It helps you blend more effectively.

And it's done ! Though I haven't made any color adjustments for this one I used an blue overlay to make it a slightly blue toned , then added some grain in the end.

Hope you guys found this helpful, feel free to ask if have any questions.
🎨 Ready to Master Blending in Procreate?
Get the tools and classes that will take your blending to the next level.
⭐ Rated 4.93/5 by 569 artists | Use code "I am awesome" for 20% off your order!
Watch process videos on Patreon